
Disclosure: Some of the links below are affiliate links, meaning, at no additional cost to you, I will earn a commission if you click through and make a purchase.
Skip to the Instant Pot Recipes. Click here!
Remember the stories of days gone by when the original, stove top pressure cookers would explode and do some major kitchen damage? Well…as much as I dream of having a bigger and better kitchen, I know that blowing it up is not the answer! So I did my research and everything pointed to the electronic Instant Pot, not only being safe to use, but being fast and economical as well. Sign me up…Yep, I bought one!
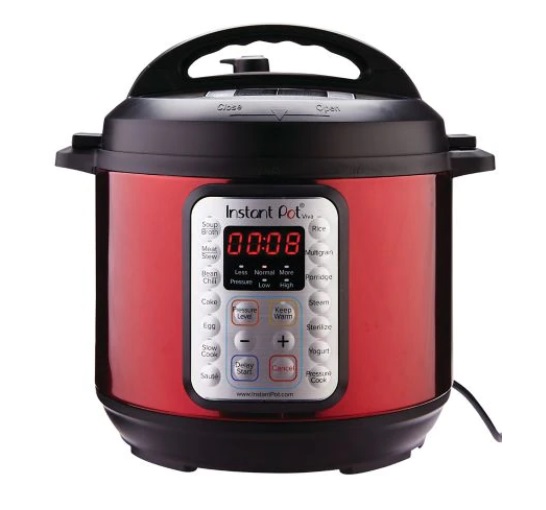
I’ve totally joined the Instant Pot lovers club! I got myself a lovely, shiny red Instant Pot earlier this year and have already used it dozens of times.
I must admit, I was a little intimidated when I first got my Instant Pot. I read the instructions multiple times to make sure I wasn’t missing anything. I cleared a space on my counter to make sure nothing was around and/or touching it. I made sure there was nothing overhead (except the ceiling) that would get in the way if worst case scenario….it went KABOOM!
So, I started off simple. The first time I used it was just to make baked potatoes. It was pretty easy. The second time was to make “hard boiled” eggs; again a fairly easy task. When both these items turned out just as they should, well…I stepped it up a notch. I decided to go all out. RIBS. Yes, you heard me! I wanted to make ribs; fall off the bone ribs slathered with BBQ sauce. I’m getting hungry just thinking about these again! If I have captured your interest and the Instant Pot has piqued your interest, continue reading below for tips, tricks and recipes that you can use with your very own instant pot.
Getting Started with your Instant Pot
- The first step is to unwrap that new toy! Remove the styrofoam, the plastic bag and take off the lid. You will find some hidden surprises inside. The Instant Pot will come with a steamer rack (trivet), rice paddle, soup scoop, rice measuring cup, condensation collector, Quick Reference Guide, Recipe Book and a manual.
- Remove the stainless steel insert (inner pot) from the plastic bag. Give it a wash with warm soapy water, along with the lid and silicone sealing ring and dry them thoroughly. **Caution: Never immerse the exterior Instant Pot housing in any type of liquid!**
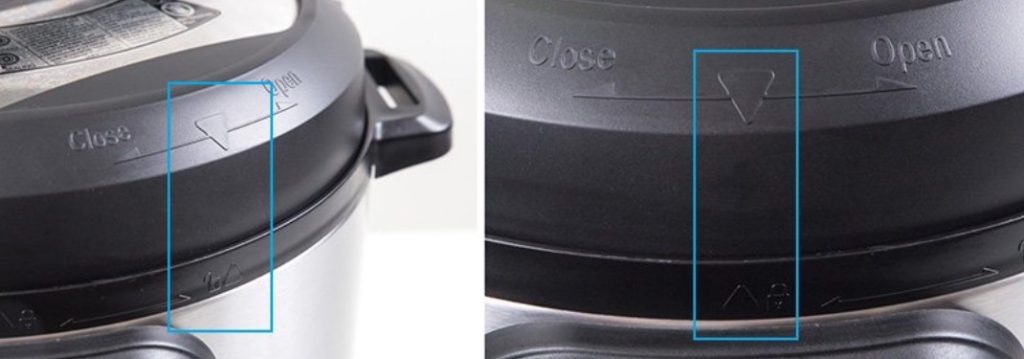
- Get familiar with the Instant Pot lid; know how to open and close. Find the markings “Close – Inverted Triangle – Open“. Underneath that you will see markings on the exterior housing: “Locked Triangle – Unlocked Triangle”
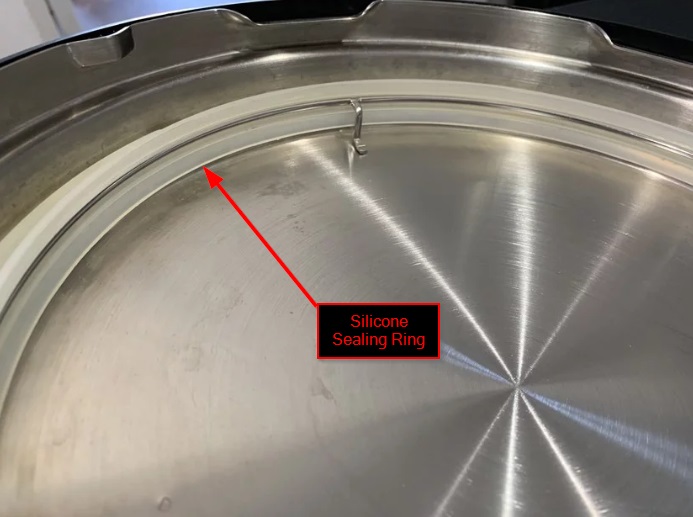
- Ensure the silicone sealing ring is fitted in properly and clear of obstruction. It’s good to have a spare silicone sealing ring as a backup because they do breakdown after a while, with usage. (Also, the silicone will retain strong food odours over time.)
- Other critical parts on the lid are the Instant Pot Steam Release Valve (Venting Knob), the Instant Pot FIoat Valve and the Instant Pot Anti-Block Shield. The Steam Release Valve should be fully attached to the lid and pushed down all the way. It is ok for it to be loose because it should be removed for washing by pulling it straight out. The Float Valve should be tested to make sure it can easily pop up and down. This can be pushed from the underside of the lid. The Anti-Block Shield can be pushed to the side to lift it up and press it down in position to install it back in.
- Next we will talk about the Steamer Rack or Trivet. This is used in many of the recipes or cooking techniques for the Instant Pot. It is stainless steel and has long handles on both sides to make it easy to lift out of the pot. The steamer rack will sit above the water level and helps the steam distribute evenly around the food. (After washing my Instant Pot and accessories, I fold the steamer rack back up and store inside the inner pot with the rest of the tools.)
- The Condensation Collector is the small plastic cup that comes with the Instant Pot. Not to be confused with the rice measuring cup, the condensation collector is more oblong in shape with flattened sides. It attaches to the slot on the back of your Instant Pot to collect steam and oversplash. Just slide it right in to the groves.
- The Rice Measuring cup should need no explanation…use it to measure rice!
- The final step in getting your Instant Pot ready to use is to plug in the power cord. Make sure to plug the power cord into the back of your Instant Pot securely and push all the way into the cooker base. you should hear a *beep* when the pot is powered up!
Cooking with your Instant Pot!
Skip to Instant Pot Recipes. Click here!
Now you are ready to start using your Instant Pot. The first thing you should do is take it for a test drive. The Instant Pot Water Test will help you determine if your pot is set up correctly and will help you familiarize yourself with how the Pressure Cooker works.
Instant Pot Water Test
- Safety check – make sure silicone ring is properly seated, make sure the venting knob and floating valve are unobstructed
- Add water – Place inner pot into the Instant Pot base. Pour 2 – 3 cups of cold water into the inner pot.
- Close lid – close lid by lining the two arrow and turn the lid in clockwise direction.
- Seal – turn the venting knob from Venting Position to Sealing Position.
- Initiate Test Run by Setting the Cooking Time – press the Manual Button (some versions may say Pressure Cook Button) OR press the Steam Button. Either of these cooking methods will work for this test. The indicator will show “30”, meaning 30 minutes pressure cooking time. Since we don’t need to “cook” that long, press and hold the “-” (minus) button until it show “2”. This means we have changed the time to 2 minutes of pressure cooking. The RED light under the High Pressure button means that “High Pressure” is the default setting.
- The indicator will change from “2” to “On” in about 10 seconds. When it shows “On” that means the pot is in the preheating cycle (heating up the water to generate steam). It will take roughly 13 minutes to reach Hi Pressure.
- Some steam will come out of the floating valve during the preheating cycle. This is normal. Once enough steam is generated, the floating valve will pop up and the pressure will start to build inside the pot. No steam should be releasing at this point.
- Pressure cooking cycle – the indicator will change from “On’ to “2” when the Instant Post has reached high pressure. It will now pressure cook for 2 minutes.
- Keep Warm Mode – After counting down the minutes, the Instant Pot will automatically enter the “Keep Warm” mode. You can press the Keep War/Cancel button on the lower right corner to turn off the pot. The indicator will switch to “OFF”. You will need to release the pressure before opening the lid.
Congratulations…It’s time to cook!
I recommend starting out with a few simple items to help you get the feel for your instant pot.
Instant Pot Hard Boiled Eggs
Instant Pot Baked Potatoes
Now that you have tried these simple items, you are ready to move on to the world of Instant Pot meals. Here’s one of my favorite Instant Pot recipes for you:
Instant Pot Hamburger Soup

Ingredients
- 1 lb Lean Ground Beef
- 1 Onion, diced
- 3 lrg Carrots, chopped in large chunks
- 4 med Potatoes, chopped in large chunks
- 3 cups Beef Broth
- 1 Bay Leaf
- 1 1/2 tsp Italian Seasoning
- 2 tsp Garlic Powder (or 3 cloves garlic, minced)
- 1 tsp Salt
- 1/2 tsp Pepper
- 1 Tbsp Worcestershire Sauce
- (1) 14 oz can Aylmer’s Italian Tomatoes (with juice)
- (1) 6 oz can Tomato Paste
- 1 – cup frozen corn (you can use frozen green beans as well)
Instructions
- Turn the pot on to the Sauté setting. Add the ground beef and the onions. Cook, stirring occasionally, until the meat is cooked. Don’t break up the meat completely, as some bigger chunks are nice in the soup. (or you can precook the meat and onions in fry pan and then add to the Instant Pot.
- Add the chopped carrots and potatoes, beef broth, bay leaf, Italian seasoning, garlic powder, salt, pepper, and Worcestershire sauce, frozen veggies. Stir.
- Dump the can of tomatoes and tomato paste on top and do not stir.
- Close the lid and set the steam release knob to the Sealing position.
- Cancel the Sauté setting. Press the Pressure Cook/Manual button and then select 7 minutes. Make sure it is set to High pressure. It will take several minutes to come to pressure.
- When the cooking cycle is finished, let the pot sit undisturbed for 10 minutes (10 minute natural release). Then carefully, in short bursts at first, release the remaining steam manually, by turning the steam release knob to the Venting position.
- Stir the soup well to incorporate the tomato paste. Then stir in the frozen vegetables and let sit for a few minutes before serving. The veggies will cook in the heat of the hot soup.